Today’s learning and fun is brought to your by letter c featuring calendar, caterpillar and clouds. Pick and choose activities that fit with your students learning.

Calendar Time
Here is a free calendar printout
You can use a calendar to teach counting and numbers, names of days of the week and months of the year, mark birthdays and holidays, and daily weather with these weather printouts.
Materials:
3 pieces of poster board
Stick on Velcro-you can buy precut ones at any craft store.
A marker pen
Scissors
On a plain poster board divide the lower ¾ 's area into 31 squares for days of the month. There should be 7 squares across for each day of the week. You will have to make 5 rows down for the number of days in a month . On the top of the calendar print the names of the week starting with Sunday.
On the second piece of poster board make the same size squares. Cut them out. Then print the numbers 1 through 31. Put the Velcro on the main calendar blank squares and the corresponding Velcro on the back of each individual number card.
On the third piece of poster board write the names of the 12 months of the year. Put Velcro on the top of the calendar for the names of the months. Put Velcro on each month of the year.
Lesson:
1. Each month put the correct name of the month on the calendar. Have your child help you say the months of the year until the current month.
2. Each day put the correct number for the day of the year. Count with your child from one to the new number. Let your child help with this activity according to his or her ability. Take turns doing the calendar.
3. Point to the days of the week to find which day of the week it is. Here is a fun way to learn the names.
Days of the week song:
In a sing song -starting low and ending high- sing the days of the week. Make a slight emphasis on “day.” Most of all have fun.
Sunday, Monday, Tuesday, Wednesday, Thursday, Friday, Saturday
4. Talk about today’s weather. Make or printout some weather indicators to put on each new day, such as a sun for sunny weather, rain cloud with rain, snow cloud with snow, a cloud, a sun with a cloud, wind blowing-such as a wind sock, etc.. You can turns playing weather person. Also, you can talk about special events, such as birthdays, holidays, and special days for family fun.
More advanced calendar activities
Latin meaning of months of the year printout
Days of the week printout
Life Skills:
Sorting Beads
Materials needed:
Small different colored beads, or candies such as M & M’s, Skittles, or multi colored jellybeans
One, Clean (washed with warm soapy water and dried) Styrofoam egg carton or muffin tins
1 large bowl
Tray
Place the muffin tins or egg carton on a tray or a small area rug. Mix and put all the candies in the big bowl. Slowly, show your child how to pick up one colored candy from the large bowl and put it into an empty cup. Have your child sort the colors by putting each color into its own individual section. This is great for color discrimination, small motor skills and matching. This activity prepares your child for reading and math readiness.
Advanced sorting: Use this game, only replace the candies with different colored buttons. Each color group of buttons should have a distinctive shape or size. Let your child start by placing one of each different color button into a section. Then blind fold or have your child shut his or her eyes and sort the buttons according to feel. The control of error is that the similar colored buttons should be in the same section.
Sensorial: (ages 2 and up)
One of the things you can do that is very similar to the cylinder exercise is to buy nesting cups or stacking nesting blocks . See directions at sensorial section under pink tower and cylinders. You can find the nesting toys in the infant section in a large grocery store or discount store. (You can even use measuring cups or bowls that fit in each other) This exercise is similar to both the pink tower and the cylinder exercises in theory. Have your child stack the nesting cups from largest to smallest. If your child gets the order confused the stack will fall over. For a lesson in gradation, you can put the nesting cups inside of each other from largest to smallest. Also, your child can take out the nesting cups and grade them in a line from smallest to largest, etc. If you have rice, salt, sugar, or water, your child can help fill each container and then feel the weight of each nesting cup. Let your child determine which cup is the heaviest, which is the lightest. For a more advanced lesson, ask your child which cup is the heaviest, next heaviest, etc.
Note: You can use every other cup if this lesson is too confusing at first. Add the other cups when your child has mastered the lesson.
Also, let your child repeat the activities as much as she or he wants to.
Temperature water bottles
This exercise helps develop the sense of touch. It also promotes the knowledge that water has various temperatures which leads to scientific observation of meteorological changes which includes, rain, snow, sleet, hail, etc
Materials:
8 empty small jars (such as baby food jars, small jelly or spice jars)
Water of various temperatures
Method:
Fill 2 of the jars of water with the same temperature water. The paired jars of water should range from icy cold to fairly warm.
Exercise: Have your child feel the jars and pair them according to temperature. After this your child can pair them with a blind fold on or have her or his eyes closed. Also, you can have your child grade the pairs from coldest to hottest.
Advanced lesson for adult and child to do together: In hot pan melt a tray of ice cubes. Show your child the ice cubes and tell them that ice is solid water. Let your child feel the solid ice cube. As the water melts in the pan, tell and show your child that the melted water is the liquid form of water. Let your child feel a spoonful of cool liquid water. As the water boils and steams, say that steam is the gas form of water. After the water starts to steam you can put a cool lid (put it in the freezer for a few minutes) at an angle over the steam. Soon rain drops start to drop off the lid. From the cool lid the warm steam starts to condense into “rain drops.”
After introducing the various states of water, ask your child to show you solid water, liquid water, and water in a gas state. Then ask your child by point to each different state what state the water is in. Talk about- Rain is liquid water. Snow or hail is solid water. Clouds are a gas form of water. Clouds are like huge gaseous lakes of water in the sky.
Observe different types of clouds in the sky. What interesting shapes do they look like? The big fluffy and puffy ones are called cumulus. The flat, long ones are called stratus clouds. Cirrus clouds are curly and feathery. Here is a printout of clouds.

A fun art idea is to make different shaped clouds using cotton balls. Paste different types of cotton clouds on blue construction paper. If your child loves texture, this cloud creation can be made by using this fluffy soap paint.
1 cup powdered soap (Ivory Soap Flakes)
½ cup liquid starch or 2 tablespoons corn starch cooked in a half a cup of water
water-enough to make the texture you are going to use
Mix the starch and soap together until the mixture is soft and moist. Add enough water to make the texture spreadable. Let your child use his or her hands to make clouds. Also, your child can use the curved back side of a spoon to spread the paint. To make interesting texture use a fork, toothpick, etc. on the clouds. When the picture is dry, spray with hair spray to keep the painting from chipping.
Science time:
In a sink or big bowl of water float a plastic container (such as a recycled food container). Put in similar objects, such as screws, coins, or nails into the container. Count together each object your child puts into the container. How many objects make the cup sink? Why does this happen? The empty container’s weight displaces more volume than water. As objects are added, the container begins to sink because it becomes closer to the weight of the water. When it sinks, the container is slightly heavier than the same volume of water.
Art and Science:
You’ll need a plastic straw, food coloring and paper.
Have your child blow through the straw onto his or her hand. What does he or she feel?
Moving air.
Put a few drops of different colored paint or food coloring on the paper and let your child blow through the straw using air pressure to make a painting.
Talk about: What is moving air? Wind. Make a point to observe the velocity of wind each day. You can do this with the calendar activity.
Red Long Rods
This is the first step for math readiness.
See directions under sensorial section.
How to make your own simple red rods.
Buy some inexpensive or get free plain yard, or meter measuring sticks. You’ll need six sticks all together. Make them in lengths according to the directions. If you are using a yard instead meters use about 3.6 inches instead of 10 centimeters for each rod to vary in length. Paint the 10 rods red and you are in business. You can also use long dowels or long craft sticks.
Math Readiness
Number Rods
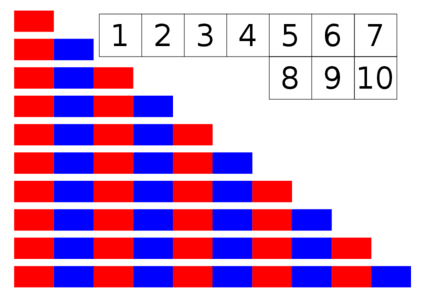
Make the same as the red rods. You can use the back side of the red rods. Color the 1st rod red, mark the second rod in 2 sections, color one section red, the other blue, Mark the 3rd rod in 3 sections color in red-blue-red- 4th rod - mark 4 sections color- red - blue- red- blue 5th rod mark in 5 sections-color -red-blue-red-blue-red continue until you have 10 rods. Make number cards from 1 through 10. Follow the directions for number rods. Here is a printout of the number rods and numbers.
Advanced Math
When you child has mastered counting and can recognize the numbers 1 through 10 you can proceed to this lesson. This is another variation of the counting game.
Counting eggs.
You’ll need: 10 plastic eggs (the type that opens in the middle) 55 counters-such as pennies, candies, poker chips, etc. Numbers 1-10 written on a piece of paper to fit in the plastic egg. Put a piece of paper with one number in each egg. To make the game more exciting, fold the paper several times after writing the number on it. On the floor mat or rug your child picks an egg and puts the correct amount of counters next to the number. Again, if your child has trouble with this, break it down to numbers 1 through 5 or perhaps 1 through 3. Add more numbers as your child masters the lesson.
You can add even more numbers to this lesson and even use 0.
Store the activity in a basket. Again, as with any lesson, let your child do this as much as he or she wants to.
Group activity
Walking the Line
Beginning exercises. Have each child sit on the line. Then sit next to the line. Put an object on the line. Crawl on the line-this is great for eye to hand coordination..
Advanced exercises: Walk the line backwards. Walk the line with a blind fold. Walk the line with a light book on your child’s head.
Art Project-cutting a curved line
Materials:
Scissors
Pencil and crayons
Plain stiff paper
Method
On a piece of paper draw down the middle of the page a line that curves out to a half a circle in the center of the line. Let your child with safety scissors cut out the shape. Your child can color and decorate the shape and make a hat out it.
If this is too difficult, just have your child cut a straight line, then the curved line.
Egg carton caterpillar
Materials:
Egg cartons
Paint
Collage material (pieces of yarn, cloth, colored paper, etc.)
Tooth picks, cut up straws, pipe cleaner
Material for eyes-buttons, pom poms, googly eyes, etc. Method
Cut long strips of egg carton.
Let your child paint or paste collage pieces on the egg carton caterpillar. Decorate with toothpicks, straws or pipe cleaners for legs and antennae.
Glue on googly eyes for a finishing touch.
Ink blot butterfly
You will need:
Plain paper, folded in half, cut like a butterfly or traced for your child to cut out
Tempera or finger paint, several primary colors (yellow, red, blue)
Scissors
On one side of the butterfly paper let each child dab various paint colors. Fold the paper. Each child gently rubs the folded paper. Open and you have a beautiful butterfly.
Introduce the letter c.
Show your child the letter “c” and say this is c, ask your child to point to the letter “c”, point to letter “c” and ask, what letter is this? Tell your child what sound c makes- hard “c”sound, like in cat. If your child has difficulty with both the letter name and sound, just introduce the sound of the letter c.
To reinforce the new letter, let your child point to the letter and rap or sing to melody of “Row, row your boat”… K, k, k, the crunchy sound, “c” makes a crunchy sound.
K, k, k k, “k” makes a crunchy sound.
If this is simple for your child, add another hard “c” sound, such as cup, caterpillar, cat.
Put letters a, b, and c together, Ask your child to find each letter, then ask the name of each letter. Lastly, ask your child to say the sound of the letter. Don’t worry if you have to go back to the second lesson, (Show me the “ah” sound letter, etc.)
Sand letters
Put some sand in a square cake pan or box for drawing purposes. Help your child trace the lower case (small) “c” Feel and say the short a sound. Another variation you might want to consider is getting chocolate pudding and some shinny butcher paper (you can get it from the local grocery store) Let your child have fun tracing the letters in this new medium.
This Weeks Family project is making a sand candle and rain gauge.
ABC Cooking
Caterpillar bread.
This is a quick and fun recipe when you use frozen bread dough.
You’ll need:
Bread dough
Licorice whips, jelly beans, chocolate chips, raisins, nuts, sugar and candy sprinkles, etc.
Divide the bread into 3 or 4 sections, depending how many children are doing this activity.
Have each child roll out the dough into a long caterpillar cylinder about 10 or 12 inches long.
Using a plastic serrated knife, have the children cut the caterpillar into 4 or 5 sections.
Place the sectioned caterpillar in an interesting design(head up, curved around, etc.) on a grease cookie sheet.
Decorate the eyes with raisins; use licorice whips for antennae and legs. You can use the jelly beans and other nuts and candies to make your creation look unique. Caterpillars are wild looking in nature so have fun.
Bake at 350f degrees for about 20 minutes or until done. ( Your bread is done when your lightly thump it with your finger and it makes a hollow sound.)
Cloud surprise
You’ll need whipped topping, instant pudding and milk. You can use premade pudding or have your child shake up his or her pudding in a small jar. Combine the milk and pudding and mix well with a whisk. Take the mixture and divide into small jars, cover tightly with the lids. Let your children shake the pudding until thick.
Let each child continue by scooping in the whipped topping in a clear bowl or cup- enough to cover the bottom of the container. Spoon in the shaken pudding, then cover with whipped topping. Have fun eating your cloud.
Reading out loud Corner
Here are some great books about caterpillars and rain.
Title: Percival the plain little caterpillar by Helen Brawley
Title: Clara Caterpillar by Pamela Duncan Edwards
Title: The very hungry caterpillar by Eric Carle
Title: Caterpillar, caterpillar by Vivian French
Title: Give yourself to the rain : poems for the very young by Margaret Wise
Title: Rain by Manya Stojic
Title: Can it rain cats and dogs? : questions and answers about weather by Melvin and Gilda Berger
Title: Come on, rain! by Karen Hesse
Title: Why does it rain? by Marian B. Jacobs
Spanish Corner
Point to your child’s hand and say, “mano.”
Ask your child where is your “mano”?
Point to your child’s hand and ask, what is this called in Spanish?
Continue the 3 period lesson for agua, boca, and mano until your child knows all 3 words.
Use all 3 words together and have your child point to agua (water), boca(mouth), mano(hand).
Ask your child to show you the 3 new words.
There are wonderful Spanish television shows on local channels, such as Sesame Street, that would give your child a great exposure to the language and a prepared Spanish environment.
Similar Pages: